Two Optical Paths to the Same Goal
Both techniques exist for the same reason: at useful magnifications, depth of field collapses to a thin optical section, and a single exposure cannot cover a three-dimensional specimen. But the two disciplines reach that point through different optics. A macro rig uses photographic lenses — a dedicated macro lens, an achromatic close-up element in front of it, or an ultra-macro lens — which are finite-conjugate designs: they form a real image of a free-standing subject directly on the sensor. At the top of the range, many macro rigs — this one included — mount a microscope objective on a tube lens attached to the camera, importing the microscope’s own infinity optics without importing its stand or its specimen handling. A dedicated microscope uses those objectives on a fixed stand: the objective emits a parallel beam that a separate tube lens converts into the final image, which is why objectives interchange so cleanly on a microscope stand and why the tube lens length is part of the magnification arithmetic.
The paths also differ in what moves during a stack. On a microscope, the specimen stays on the stage and the focus drive carries it through the objective’s focal plane, frame by frame — a z-stack. On a macro rig, the specimen stands still in the world and the entire camera and optic travel past it on a motorised rail. It sounds like a symmetry, but the mechanical difference cascades into everything else: how the specimen must be prepared, how it can be lit, and what the optics are corrected for.
Depth of Field and Aperture Arithmetic
The two systems even specify their apertures differently, and the depth of field follows from that specification. On the photographic side, the working aperture is the effective f-number, which grows with magnification — approximately N × (1 + m) for symmetric designs — and the depth of field shrinks with the square of magnification. On the objective side, there is no diaphragm at all: the working aperture follows from the objective’s numerical aperture as N_image = m / (2 × NA). At 10× / NA 0.25 that is f/20, while applying the photographic formula to the same optic would report f/16 — a quarter more depth of field than the glass actually delivers.
The worked consequences are tabulated in Note 05, but the shape of the answer is worth restating: at 2.5× and f/8 on a macro lens, the sharp slice is roughly 134 µm deep; at 5× on an ultra-macro lens, roughly 58 µm; at 10× on a plan objective, about 6 µm. Stopping down buys depth on the photographic side — until diffraction begins spending the resolution the extra depth was supposed to serve. The objective route simply has no stop to close: its NA is fixed at manufacture, and its depth of field comes with it.
Note 05 — Rail Step Size & Depth of Field: the full treatment →
Working Distance and Specimen Handling
The practical difference is what each instrument asks of the specimen. Microscopy is built around prepared material. Specimens are typically fixed, dehydrated, sectioned or stained, and mounted — frequently under a coverslip in mounting medium, on a slide, on the stage. The objectives are designed and corrected with that exact sandwich of glass in the optical path. The reward is standardisation, repeatable geometry and access to extreme resolution; the cost is that the subject is rarely alive and rarely intact.
A macro rig inverts the arrangement. The specimen stands free — a living flower still on the plant, an arthropod on its substrate, an uncoated artefact — and the camera and optics travel past it on the rail while diffused flash lighting is arranged around it at angles you choose. Nothing is fixed, cut, stained or mounted, and nothing needs to fit on a stage or survive immersion. For documentation of living material, whole organs and intact morphology, that freedom is not a convenience; it is the entire point of the method.
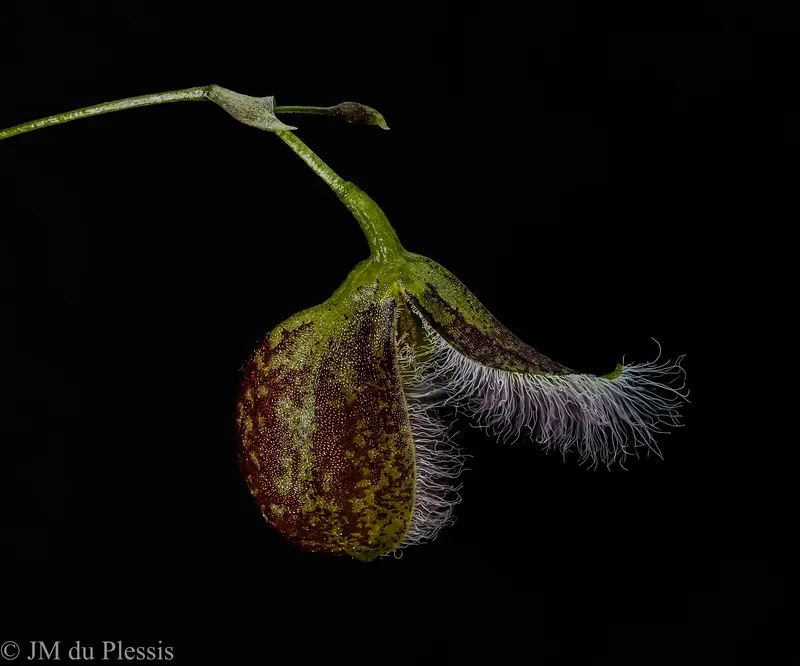
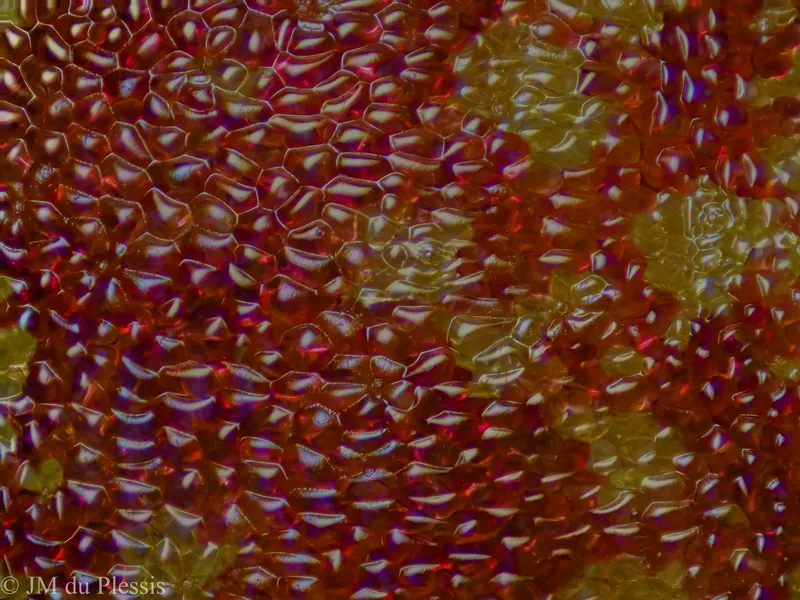
Both frames show Pleurothallis cypripedioides — the same species, the same photographic method, two optical worlds. The first carries the whole flower and its slipper-shaped morphology at a magnification where context survives. The second abandons the whole-organism view and buys cellular surface texture instead. Neither image is a lesser version of the other; they are different statements a researcher might need to make about the same plant.
Resolution Ceilings
Numerical aperture, not magnification, sets the diffraction-limited resolution of an optical system — and this is where microscopy holds the high ground. Objectives climb through NA 0.25 at 10×, 0.4 at 20×, 0.65 at 40× and beyond with immersion designs, each step buying finer genuine detail. A photographic macro path can raise its effective f-number to push diffraction outward, but every stop of depth costs resolution, and the ceiling sits far below what a 0.65-NA objective resolves routinely.
What the objective route gives up in exchange is context. At the magnifications where the two techniques overlap, a macro frame still carries whole-organism morphology — a complete flower, its posture, its scale, its substrate — where a microscope frame at the same nominal magnification carries a specimen fragment under glass. For many documentation questions that trade is the wrong one to make in either direction, which is precisely why the choice deserves to be made deliberately.
One honest nuance comes with the objective route: the boundary between the disciplines is real, but it is porous, and equipment crosses it more easily than specimens do. Plan objectives are typically corrected for a 0.17 mm cover glass; using them on uncovered, living material is a known compromise, one that holds up well at moderate NA and degrades as NA climbs. The method borrows the optics without borrowing the preparation.
Where the Ranges Overlap — and Where They Diverge
The site’s working range runs from 1× to 10×: whole-flower documentation at 1×–2.5× through macro-lens configurations, deeper structure at 4×–5× through an ultra-macro lens, and surface detail at 10× through a plan objective. Routine microscopy begins where objectives start, at 4×, and runs through 100× with straightforward headroom far past anything a macro rig can reach. The practical overlap zone is therefore roughly 2×–20× — a band where both instruments can deliver a usable image of the same subject.
Inside that band, magnification is the least informative way to choose. The decisive questions are about the specimen and the statement the image must make. A living flower that cannot be sacrificed, an intact type specimen, an artefact that must not be coated or sectioned, a structure whose meaning depends on its context — these push the choice toward macro focus stacking regardless of magnification. Internal anatomy, sectioned material, stained preparations, and requirements for maximum resolved detail push equally firmly toward the microscope.
Choosing Between Them
| Macro focus stacking | Microscope z-stacking | |
|---|---|---|
| Optical path | Finite-conjugate macro lenses, or microscope objectives on tube lenses — camera on a horizontal rail | Infinity-corrected objective + tube lens on a stand |
| Typical range | 1×–10× | 4×–100×+ objectives, routine |
| Specimen state | Living, intact, free-standing, uncoated | Fixed, sectioned or mounted, often under coverslip |
| What moves | Camera and optics, on a horizontal rail | Specimen, through focus on the stage |
| Depth-of-field control | Aperture and rail step, chosen per subject | NA fixed at manufacture; focus step |
| Resolution ceiling | Moderate — diffraction-limited by effective aperture | High — NA 0.4–0.65+ and immersion designs |
| Excels at | Whole specimens in context, living material | Internal structure, fine detail, routine standardisation |
Read factually, the case for a macro rig over a microscopy core facility is narrow and precise — and inside that range it is not a compromise at all. When the subject is living and must remain so, when the documentation must show whole-organism morphology in context, when the specimen cannot be prepared, sectioned or mounted without destroying the very thing being documented, macro focus stacking is not the cheaper substitute for microscopy; it is the only instrument that can make the image at all. When the question is finest resolved structure, the microscope wins outright, and this site’s method does not pretend otherwise.
New to the vocabulary of stacking — depth of field, reproduction ratio, rail steps?
Start with Note 00 — What Is Macro & Focus Stacking, Exactly? →